


Hello! I’m Tami Hewlett from California, USA and today I’m sharing a quick and easy way to create a watercolored background with stamps and a spritzer. I love easy techniques that have a great “Wow!” factor, and this one definitely qualifies. It’s even better when it’s easy to do and comes out every time. As part of the Artisan Design Team, we have the opportunity to submit these tips & techniques once and a while for the Stampin’ Up! Facebook and Instagram pages. This post is my last one as a member of the 2022 team. It’s a little sad, but I also feel a huge sense of accomplishment:)
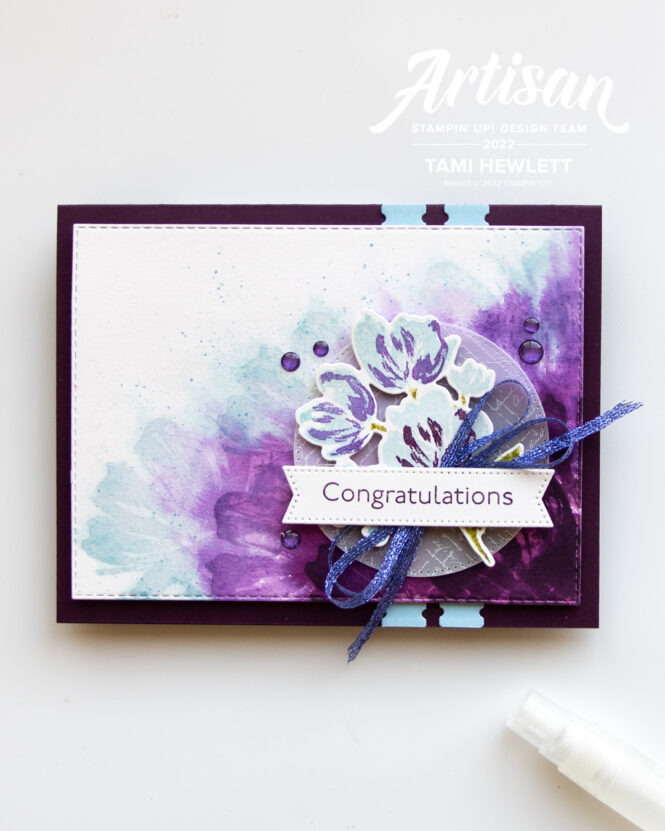
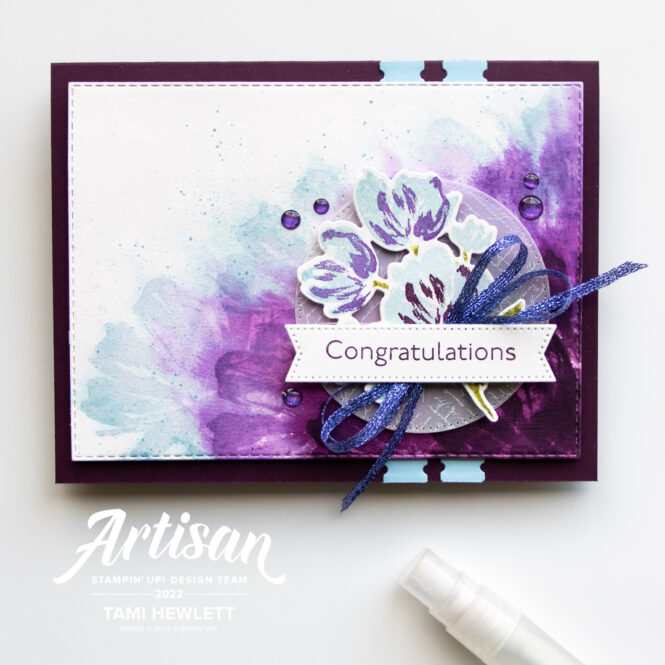
Here’s my completed project featuring the Art Gallery stamps and coordinating Floral Gallery Dies. I also used Stylish Shapes and Stitched Rectangle Dies on my project.
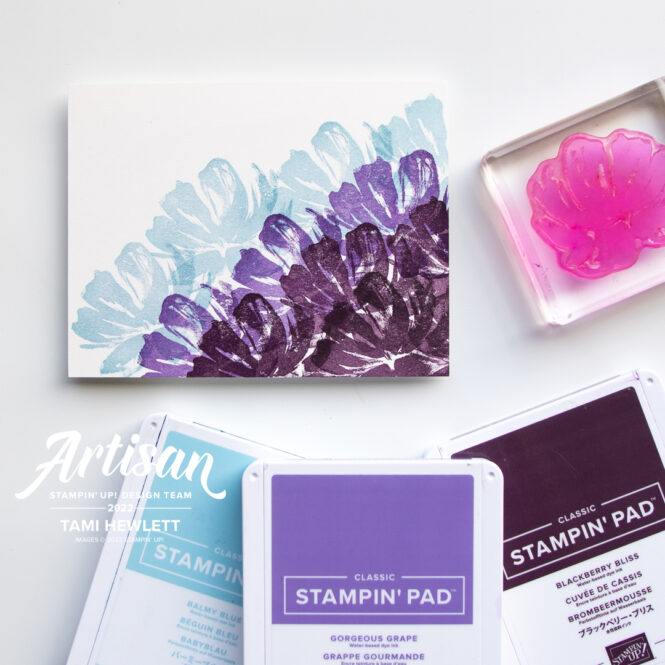
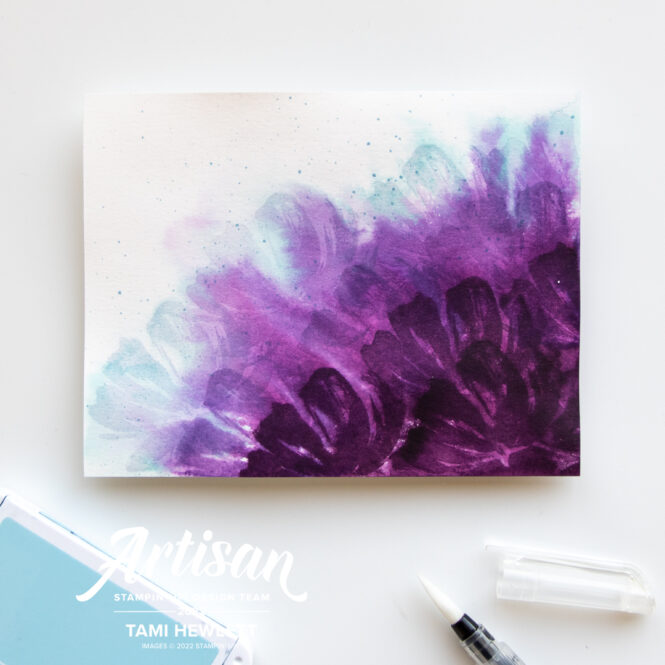
Step 1: Stamp an image with multiple colors on Shimmery White Cardstock. (Fluid 100 Watercolor Paper would also work well.) In this example, I used the large flower stamp from the Art Gallery Stamp Set and Blackberry Bliss, Gorgeous Grape, and Balmy Blue ink.
Step 2: Lightly spritz the back of the paper first, to stop it from curling. Then spritz the front just enough so the ink starts to bleed. Try to avoid overspritzing (or shooting yourself in the eye or glasses! Haha!) If you accidentally over-spritz, have a paper towel handy to absorb the excess water, but use it sparingly, because it will also remove some of the ink. For this project, I aimed my spritzer from the bottom/right corner pointing towards the top/left corner.
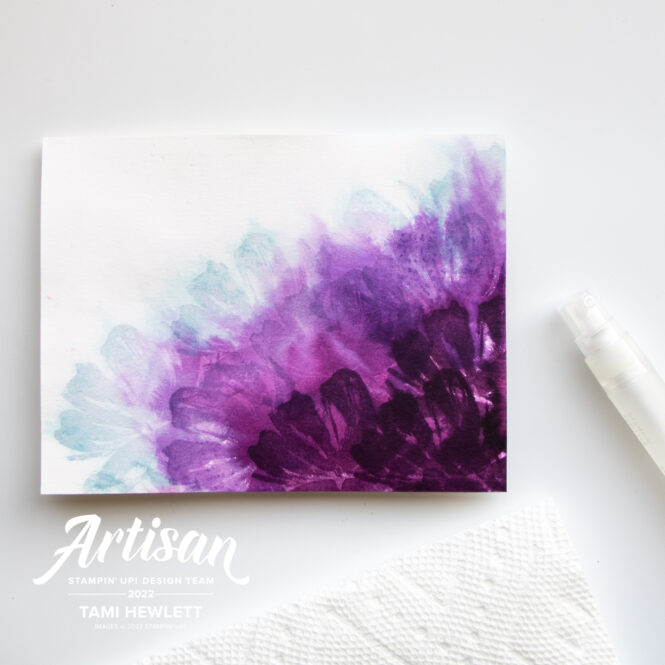
Step 3: Let the project air dry. Then, if desired add splatter with a Water Painter dipped in ink. Squeeze your ink pad to pool ink in the lid, and then add a little water and mix. Dip the Water Painter in the mixture and use the cap to flick the brush towards the paper.
Step 4: Cut and decorate. I cut out the background panel using a Stitched Rectangle Die. Before adding it to a Blackberry Bliss card base, I adhered a couple Balmy Blue die-cuts using the Floral Gallery Dies.
To stamp the flowers, I inked up the stamp with Balmy Blue ink and then used an Old Olive Stampin’ Write Marker to color the stems directly on the stamp. I gave the stamp a light spritz before stamping on Shimmery White Cardstock. Next, I stamped the smaller overlay flowers with Gorgeous Grape and Blackberry Bliss ink and cut it out with the coordinating die. The rest is pretty straightforward. I cut the circle from Vellum Layering Designs Paper and stamped the sentiment with Blackberry Bliss ink on Shimmery White Cardstock. Then, I cut it out with a Stylish Shapes Die. The final touches were some Gorgeous Grape Glossy Dots and an Orchid Opulence Woven Ribbon bow.
I hope you try this technique. I think you’ll be surprised at how easy it is to do and the beautiful results.
Have a wonderful and creative day!

Purchase products from my online store to qualify to receive free exclusive project tutorials. This month’s PDF includes 12 creative tutorials designed by my demonstrator friends and I to inspire your paper crafting! The projects feature products from the May-August 2026 Catalog and current Online Exclusives. Enjoy!


 Layering Designs")

 Woven Metallic Ribbon")


Above and beyond! Wish you were next door in Cameron Pk! We could do beach trips together!
Awe, thanks! That really means a lot!!!
Tami,
You have been the stand out designer on the Artisan Team this year. Your creativity continued to grow the last couple of years and provided us tremendous inspiration. Each design reflected the thought and effort you gave your projects, you should feel great pride in your accomplishment. It was fabulous to watch you grow and emerge as an artistic leader.
Michelle, Thank you so much! I can’t even express what that means to me. xxx
Thanks so much Sue!!! I appreciate your words of encouragement. ❤️❤️❤️
Great technique! You will be missed on the team, but I’ll be subscribing so i don’t miss your posts.
Thanks for all the inspiration Tami!
Sue