

Hello Friends and welcome to a new Stampin’ Fancy Friday. For August, we have a Letters Challenge! All our projects include letters in one way or another! This is going to be fun; projects could include scrapbooks, cards, 3D projects, gifts etc. The field is wide-open, and I can’t wait to see what all the creative designers dream up!
To see all the designers’ projects using this month’s theme, keep an eye on the Stampin’ Fancy Friday Facebook and Instagram pages. We’d also love to see any of your projects using our theme! Be sure to tag them with @stampinfancyfriday so we can find and admire them!
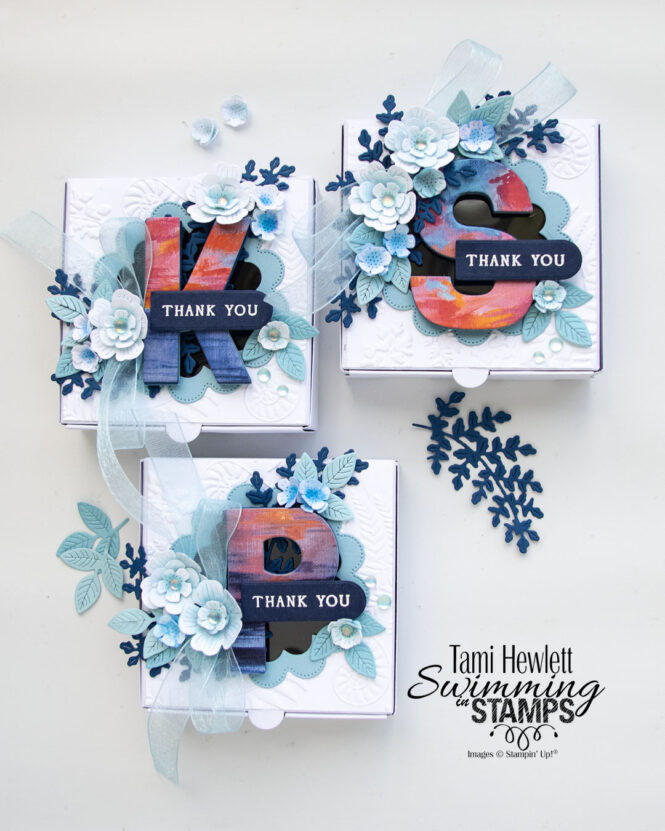
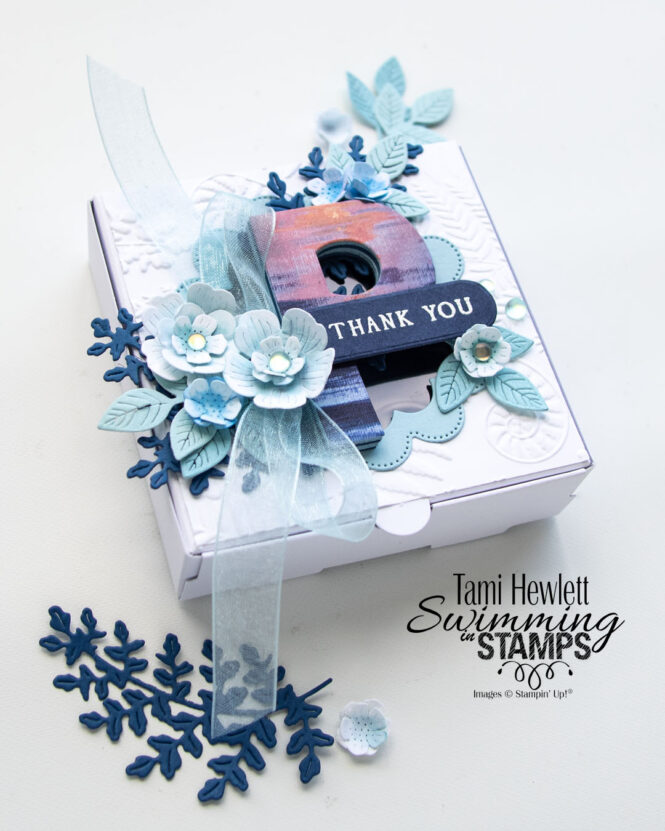
For my projects, I designed personalized gift boxes for some very special family members/friends who helped me pull off a BIG surprise for my daughter who’s getting married this month. I mean these ladies really stepped up and went over and above, so I needed to do something very special. And to me, the only way to show that kind of gratitude is to make something creative and handmade (along with a nice gift inside.)
I used the Scalloped Window Boxes and added their initial to the front. Each initial includes 13 layers stacked on top of each other to create a thick letter (1 – Scenic Coast Designer Series Paper (DSP), 3 – Balmy Blue Cardstock, 3 – Blueberry Bushel Cardstock, 3 – Balmy Blue Cardstock, and 3 Blueberry Bushel Cardstock.) I even put some thought into how I cut the Scenic Coast DSP. For example, I cut Skye’s from the “sky” area; I cut Paige’s from the ocean because she’s a big scuba diver, and I cut Karen’s from the center because she loves all kinds of nature.
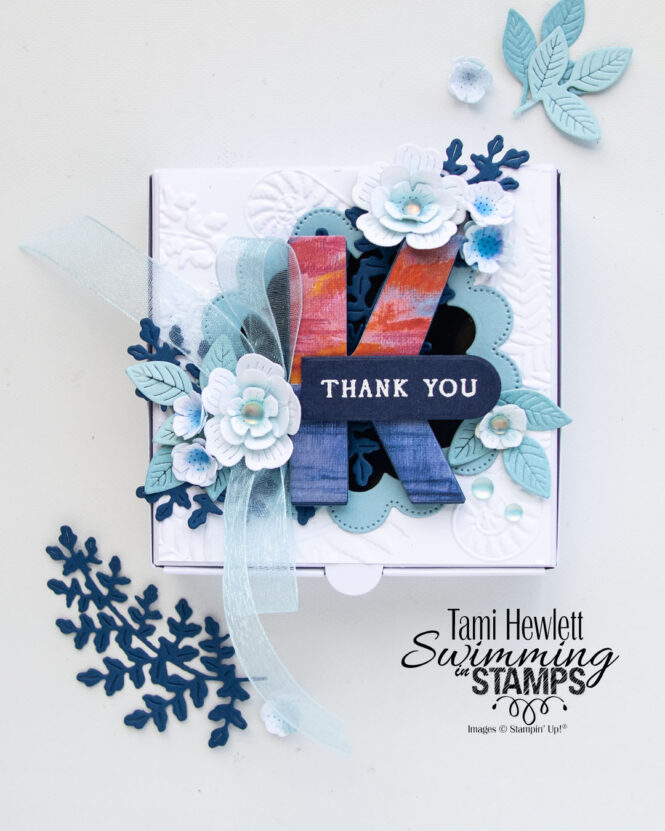
To start, I covered the box tops with a layer of Basic White Cardstock dry embossed with the Fern & Flora 3D Embossing Folder. Then, I used the Scalloped Blooms Dies to cut the Balmy Blue frame for the window box.
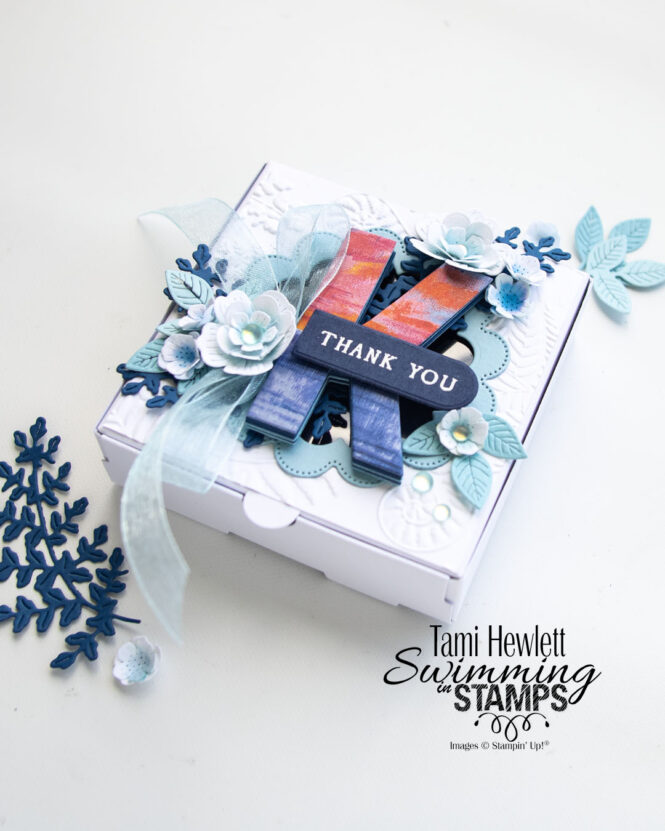
I wanted to draw attention to the big letters, so I took advantage of the vibrant colors and kept everything else in the blue tones. To make the flowers, I used both the Fragrant Layers and Scalloped Blooms Dies to cut Basic White Cardstock. Then, I watercolored the flowers with both Balmy Blue and Blueberry Bushel ink. Before building the flowers, I shaped them by using a stylist from the Take Your Pick Tool to push them into a Stampin’ Piercing Mat and curl the petals. (Note: I have one Piercing Mat for actual piercing and doing things like this and another for stamping, so the one I use for stamping stays flat and unblemished.) Pushing the flowers into the Piercing Mat really helps to form deep curves.
To layer the flowers, I mostly used Mini Glue Dots. They are easy and mess-free.
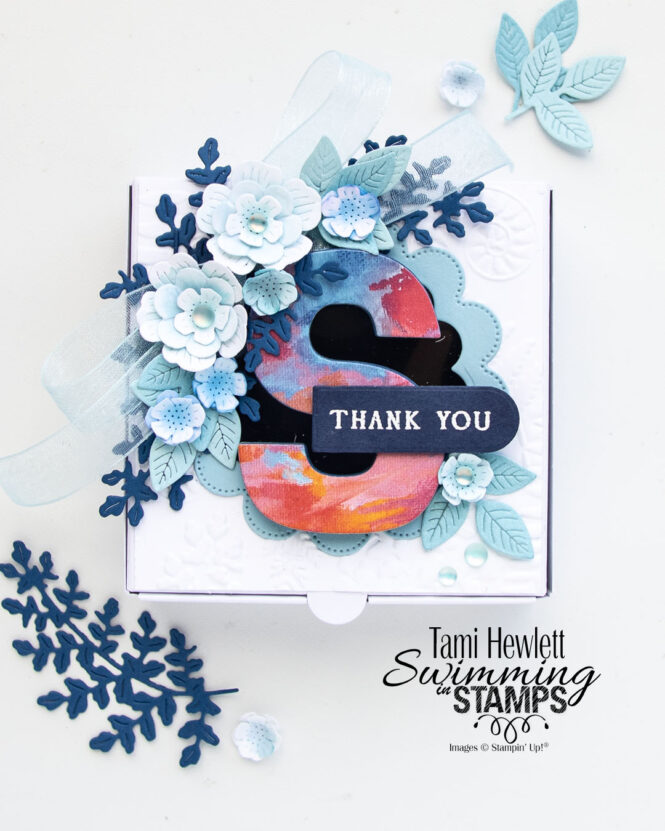
I cut the Fragrant Layers leaves from Balmy Blue Two-Tone Cardstock so I’d have a subtle difference in colors. As for the larger leaves, I used the Fern & Flora Dies and Blueberry Bushel Cardstock.
Each box is layered slightly different to enhance the particular letter. Sometimes, I found it necessary to cut the Fern & Flora dies so they flowed in the right direction.
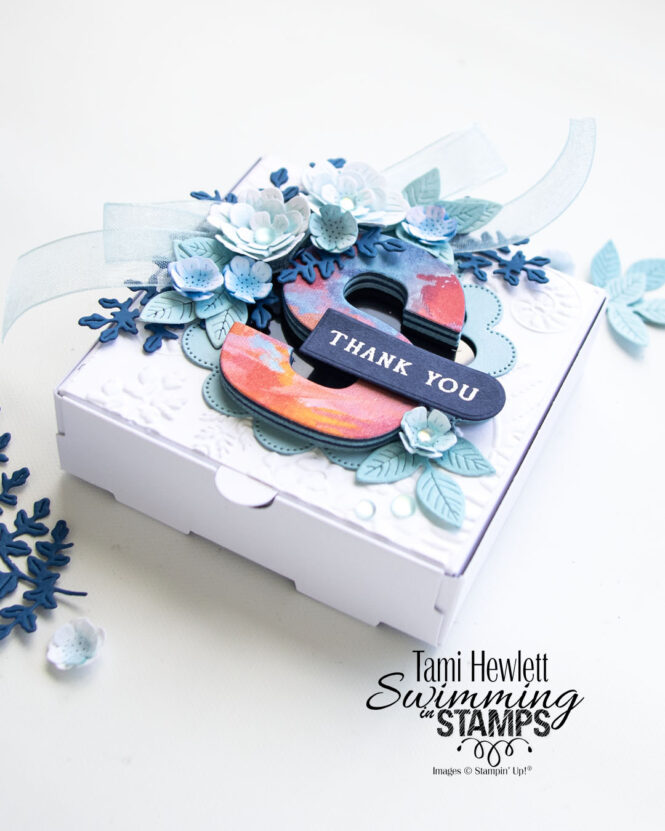
After lightly positioning the elements in place, I secured them better by slipping lots of Mini Glue Dots underneath.
The “Thank You” sentiment is from the Rolling Waves Stamp Set. I fit perfectly on the Scalloped Blooms die-cut!
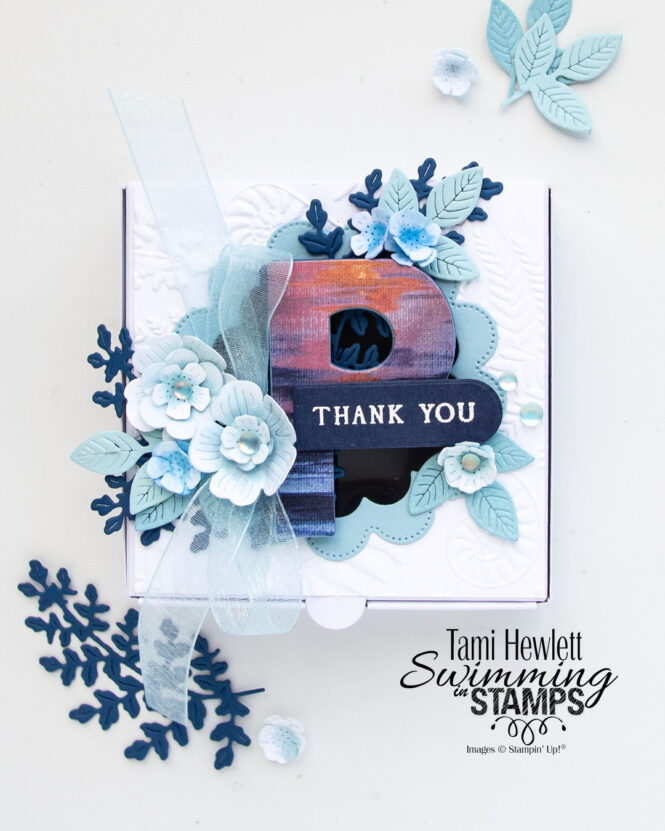
As a final touch, I added some Balmy Blue Sheer Ribbon (retired) and Frosted Iridescent Dots (retired).
I’m really hoping the ladies love these boxes, along with the gifts. I think they will! I love the feeling of finishing a project like this and being excited to give it away. xxx
Have a wonderful and creative day!

Purchase products from my online store to qualify to receive free exclusive project tutorials. This month’s PDF includes 12 fantastic tutorials designed by my demonstrator friends and I to inspire your paper crafting! The projects feature products from the September-December 2026 Catalog and current Online Exclusives. Enjoy!
![Party Alphabet Dies [ 165263 ]](https://assets1.tamsnetwork.com/images/EC042017NF/165263s.jpg "Party Alphabet Dies [ 165263 ]")
![Scalloped Blooms Dies [ 167646 ]](https://assets1.tamsnetwork.com/images/EC042017NF/167646s.jpg "Scalloped Blooms Dies [ 167646 ]")
![Fragrant Layers Dies [ 167154 ]](https://assets1.tamsnetwork.com/images/EC042017NF/167154s.jpg "Fragrant Layers Dies [ 167154 ]")
![Fern & Flora Dies [ 168991 ]](https://assets1.tamsnetwork.com/images/EC042017NF/168991s.jpg "Fern & Flora Dies [ 168991 ]")
![Rolling Waves Photopolymer Stamp Set [ 167142 ]](https://assets1.tamsnetwork.com/images/EC042017NF/167142s.jpg "Rolling Waves Photopolymer Stamp Set [ 167142 ]")
![Fern & Flora 3 D Embossing Folder [ 167744 ]](https://assets1.tamsnetwork.com/images/EC042017NF/167744s.jpg "Fern & Flora 3 D Embossing Folder [ 167744 ]")
![Balmy Blue Classic Stampin' Pad [ 147105 ]](https://assets1.tamsnetwork.com/images/EC042017NF/147105s.jpg "Balmy Blue Classic Stampin' Pad [ 147105 ]")
![Blueberry Bushel Classic Stampin' Pad [ 147138 ]](https://assets1.tamsnetwork.com/images/EC042017NF/147138s.jpg "Blueberry Bushel Classic Stampin' Pad [ 147138 ]")
![Versamark Pad [ 102283 ]](https://assets1.tamsnetwork.com/images/EC042017NF/102283s.jpg "Versamark Pad [ 102283 ]")
![Basics Wow! Embossing Powder [ 165679 ]](https://assets1.tamsnetwork.com/images/EC042017NF/165679s.jpg "Basics Wow! Embossing Powder [ 165679 ]")
![Heat Tool (Us And Canada) [ 129053 ]](https://assets1.tamsnetwork.com/images/EC042017NF/129053s.jpg "Heat Tool (Us And Canada) [ 129053 ]")
![Scalloped Window Boxes [ 167655 ]](https://assets1.tamsnetwork.com/images/EC042017NF/167655s.jpg "Scalloped Window Boxes [ 167655 ]")
![Basic White 8 1/2" X 11" Cardstock [ 166780 ]](https://assets1.tamsnetwork.com/images/EC042017NF/166780s.jpg "Basic White 8 1/2\" X 11\" Cardstock [ 166780 ]")
![Balmy Blue 8-1/2" X 11" Cardstock [ 146982 ]](https://assets1.tamsnetwork.com/images/EC042017NF/146982s.jpg "Balmy Blue 8-1/2\" X 11\" Cardstock [ 146982 ]")
![Balmy Blue 12" X 12" (30.5 X 30.5 Cm) Two Tone Cardstock [ 166682 ]](https://assets1.tamsnetwork.com/images/EC042017NF/166682s.jpg "Balmy Blue 12\" X 12\" (30.5 X 30.5 Cm) Two Tone Cardstock [ 166682 ]")
![Blueberry Bushel 8-1/2" X 11" Cardstock [ 146968 ]](https://assets1.tamsnetwork.com/images/EC042017NF/146968s.jpg "Blueberry Bushel 8-1/2\" X 11\" Cardstock [ 146968 ]")
![Night Of Navy 8-1/2" X 11" Cardstock [ 100867 ]](https://assets1.tamsnetwork.com/images/EC042017NF/100867s.jpg "Night Of Navy 8-1/2\" X 11\" Cardstock [ 100867 ]")
![Scenic Coast 6" X 6" (15.2 X 15.2 Cm) Specialty Designer Series Paper [ 167773 ]](https://assets1.tamsnetwork.com/images/EC042017NF/167773s.jpg "Scenic Coast 6\" X 6\" (15.2 X 15.2 Cm) Specialty Designer Series Paper [ 167773 ]")
![Water Painters [ 168253 ]](https://assets1.tamsnetwork.com/images/EC042017NF/168253s.jpg "Water Painters [ 168253 ]")
![Stampin' Pierce Mat [ 126199 ]](https://assets1.tamsnetwork.com/images/EC042017NF/126199s.jpg "Stampin' Pierce Mat [ 126199 ]")
![Take Your Pick [ 144107 ]](https://assets1.tamsnetwork.com/images/EC042017NF/144107s.jpg "Take Your Pick [ 144107 ]")
![Balmy Blue 1/2" (1.3 Cm) Sheer Ribbon [ 165767 ]](https://assets1.tamsnetwork.com/images/EC042017NF/165767s.jpg "Balmy Blue 1/2\" (1.3 Cm) Sheer Ribbon [ 165767 ]")
![Frosted Iridescent Dots [ 165766 ]](https://assets1.tamsnetwork.com/images/EC042017NF/165766s.jpg "Frosted Iridescent Dots [ 165766 ]")
![Mini Glue Dots [ 103683 ]](https://assets1.tamsnetwork.com/images/EC042017NF/103683s.jpg "Mini Glue Dots [ 103683 ]")
![Multipurpose Liquid Glue [ 110755 ]](https://assets1.tamsnetwork.com/images/EC042017NF/110755s.jpg "Multipurpose Liquid Glue [ 110755 ]")
![Mini Stampin' Dimensionals [ 144108 ]](https://assets1.tamsnetwork.com/images/EC042017NF/144108s.jpg "Mini Stampin' Dimensionals [ 144108 ]")