


It’s time for two more 2021 Desktop Calendars! I design and make these 4″ x 6″ calendar pages throughout the year, so by the time December rolls around, I have eight full sets to give out as gifts to family and friends. They love getting them, and it’s one more great excuse to use my stamps and designer series papers!!!
May 2021 Calendar:
For May, I used the Above The Clouds stamp set. I love this happy little hot air balloon! Then, to really make it pop, I used a fun and easy technique to create a background sky.
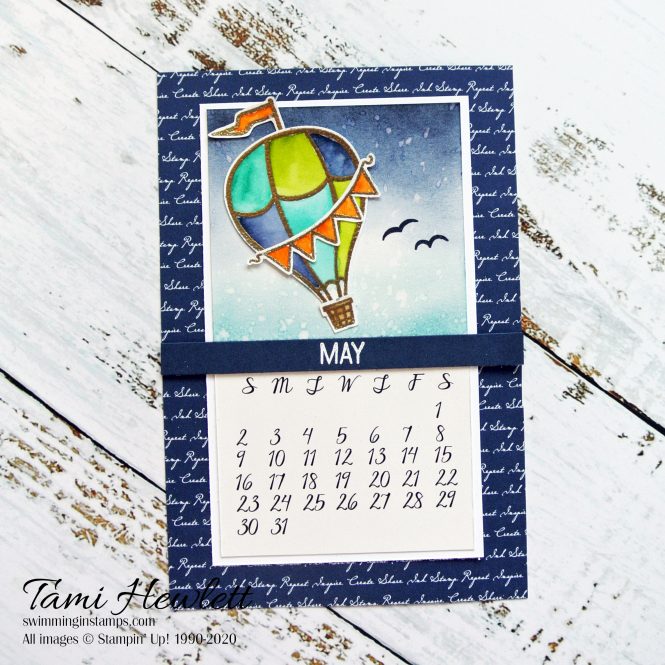
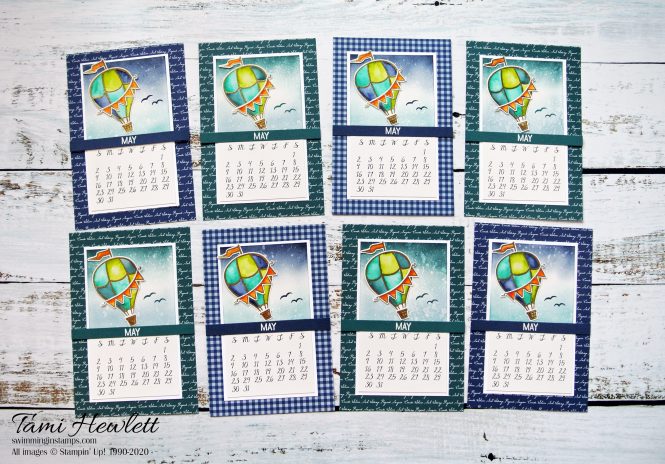
I always start my calendar pages by selecting a pretty background designer series paper. For May, I chose various sheets of 6″ x 6″ Designer Series Paper. Since there are only four sheets of each color, I selected both Night of Navy and Pretty Peacock and made two slightly different versions.

May Tutorial:
- To create the ombre background, print the calendar page (see instructions below) on Shimmery White Cardstock, and then use a scrap piece of paper to mask out the bottom half so the calendar portion stays white. Use Sponge Daubers to apply Balmy Blue and Night of Navy ink on the Night of Navy page, and Pretty Peacock and Seaside Spray ink on the Pretty Peacock page. Use small circular motions to apply the ink evenly.
- Hold the cap of an Aqua Painter over the ombre background and flick the brush towards the paper to splatter clear water. Wait 30 seconds and mop up with a paper towel. This removes some of the ink and creates that great splatter effect.
- Stamp and emboss the balloon, basket, and flags in gold on Shimmery White Cardstock. Punch out balloon and basket with Hot Air Balloon Punch, and cut out flags with scissors.
- Squeeze ink pads to pool ink in the lids and watercolor balloon with Night of Navy, Bermuda Bay, and Granny Apple Green ink for Night of Navy page. Substitute Pretty Peacock for Night of Navy for the other page. Watercolor the flags with Pumpkin Pie ink and the basket with Soft Suede. I like to start with a light wash and then add more saturated color in the shadows.
- Adhere balloon, basket, and flags, and then stamp birds in either Night of Navy or Pretty Peacock ink.
- Stamp and emboss month in white on either Night of Navy or Pretty Peacock Cardstock and trim close to form a strip. (I used the retired Date It stamp set, but you could substitute any small alphabet set.)
- Adhere layers with Snail Adhesive.
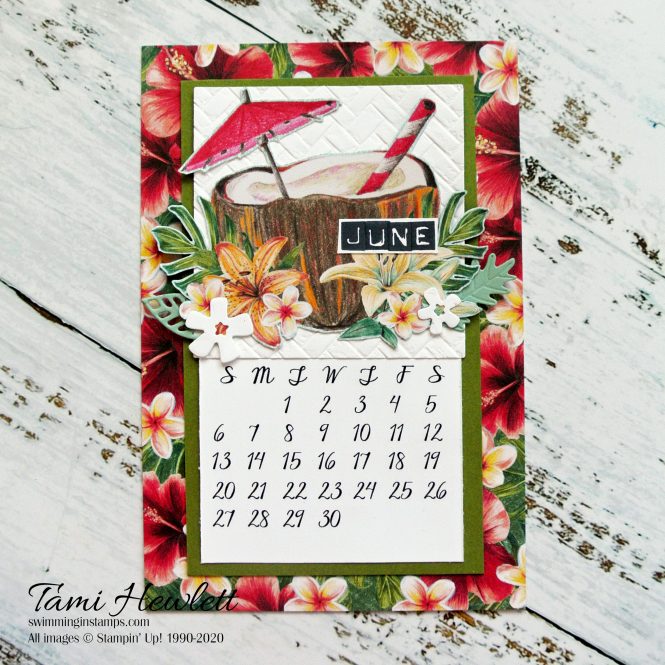
June 2021 Calendar:
For the June calendar, I went totally tropical!!! I used the Tropical Oasis Memories & More Cards to create several versions of this calendar page. Since there are only two cards of each design (and I had used some of them) I picked five different cards. However, the designs are all very similar.
These pages make me dream of Hawaii, tropical drinks, and sand in my toes!

I used both Tropical Oasis Designer Series Paper and Memories & More Cards for the background. Since the backgrounds are very busy, I decided to place a solid mat of Old Olive behind the Whisper White calendar layer.
June Tutorial:
- For most of the pages, I started out by fussy cutting the Tropical Oasis Memories & More card image. Tip: Study the image, and start cutting at the most difficult part. For example, I started with the umbrella above. Also, I found it easier to cut around the outside of the leaves first, and then go back and cut out the small inside sections.
- Use Layering Squares or Circles to cut a background layer from Whisper White Cardstock and then emboss with the Coastal Weave 3D Embossing Folder.
- Add random die cut leaves and flowers as desired (using In the Tropics and Tropical Dies.) Card above features Mint Macaron and Whisper White dies.
- Stamp JUNE with the retired Labeler stamp set, or stamp set of your choice, using Memento ink on Whisper White Cardstock. Trim.
- Adhere with Snail Adhesive.
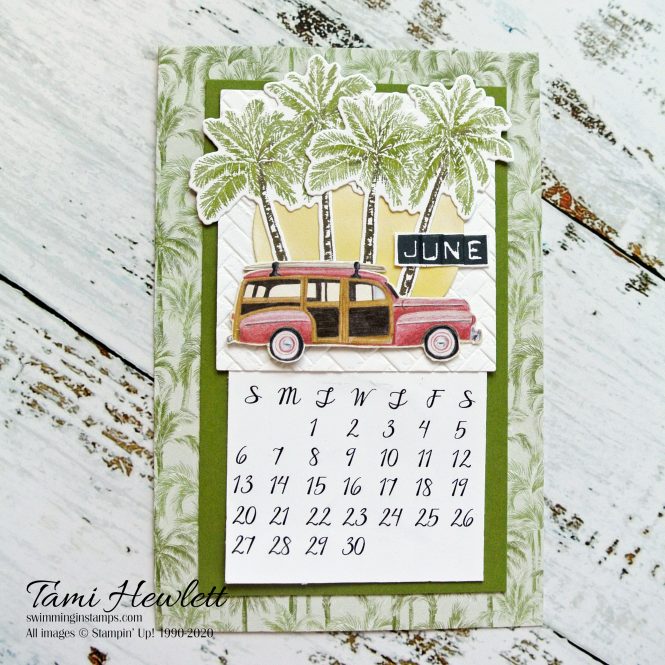
The Woodie Car version above is a little different. That image was much smaller, so I added a few background items.
- Use Layering Circles Dies to cut a “sun” from Shimmery White Cardstock.
- Watercolor the sun with So Saffron ink and let dry.
- Use the following markers to add ink directly to the red rubber of the Timeless Tropical palm tree stamp: Pear Pizzazz and Old Olive to the palm leaves and Soft Suede to the trunk. Huff on the ink to reactivate it and then stamp on Whisper White Cardstock. Cut out with In The Tropics Dies.
- Layer with Snail Adhesive as shown.
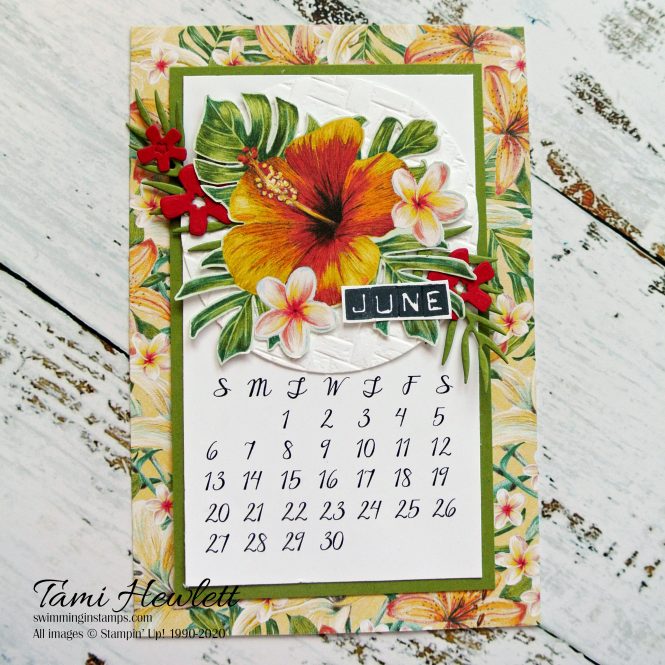
Hibiscus flower page features Real Red In the Tropics flowers and Old Olive Tropical Dies.

Guitar and Aloha pages feature Whisper White In the Tropics and Tropical leaves.

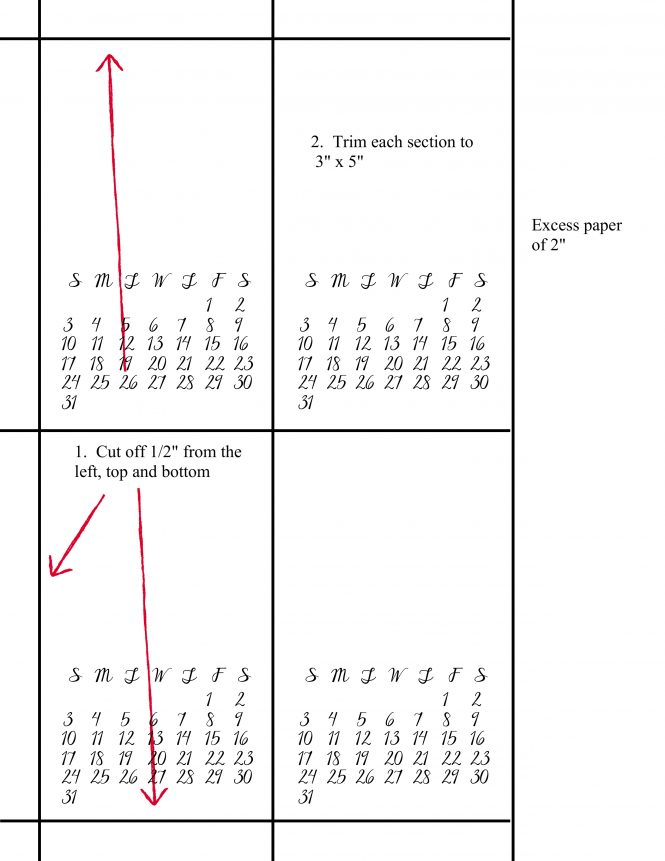
I created the calendar pages using My Memories Suite software. You can download the May calendar HERE (PDF) or HERE (JPEG) and the June calendar HERE (PDF) or HERE (JPEG.) Print the May calendar on Shimmery White Cardstock and the June calendar on Whisper White Cardstock with the smallest margins possible for your printer. The print is colored black on both pages. I designed the pages to go all the way to the edges of a standard 8-1/2″ x 11″ sheet of cardstock. Trim as follows:
Stay tuned for more 2021 Desktop Calendars in July! Enjoy and happy crafting!!!

Use the May Host Code ZQ7EGSNM for purchases at my online store to qualify to receive free exclusive tutorials and a special thank you card from me. This month’s PDF includes great techniques and super creative ideas. You’re going to LOVE them!!!
Supplies for the May Calendar:
Product List


 Designer Series Paper")
 Designer Series Paper")


Supplies for the June Calendar:
Product List


")


Your desk calendars are beautiful!! What is the best way for recipients to display these? Thank you!
Hi Nicole. Thank you so much! The calendars are 4×6 and fit in a standard frame. Simply display each month individually.
Thank you, Tami! That is the perfect way!