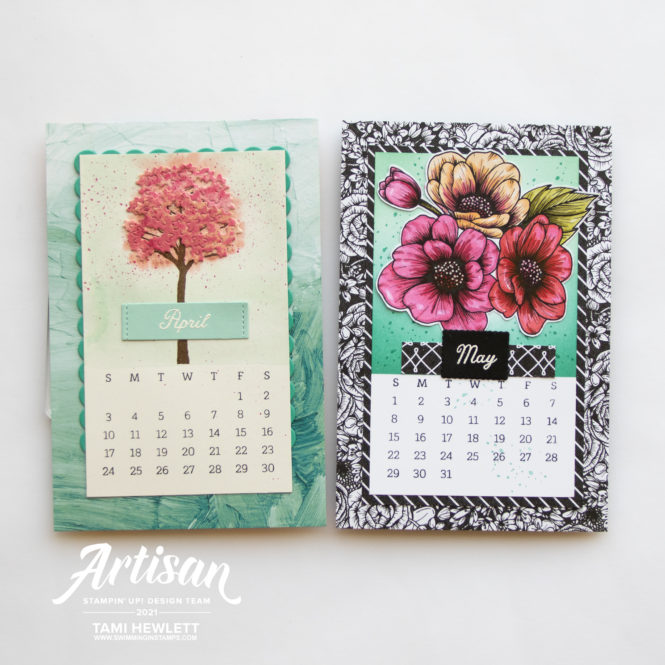
Hi Friends! Today, I’m sharing my next two 2022 Desktop Calendars pages. I work on these calendar pages during the year so by the time Christmas comes along, I have eight sets to hand out as gifts to close family and friends. They all measure 4″ x 6″ and are designed to be displayed individually in a standard frame.
Before continuing, remember that there’s FREE shipping today only on Stampin’ Up! orders of $50 or more!

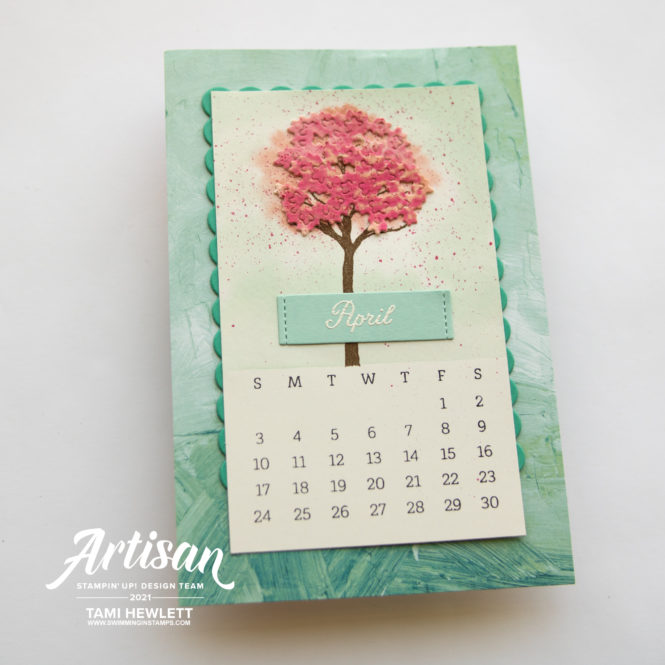
Now, back to the calendars. In the past, I’ve produced the 3″ x 5″ calendar layer digitally using My Memories Suite software. But this time, I decided to switch things up and use the new Days To Remember Photopolymer Stamp set. Let me show you what I did, starting with April 2022.
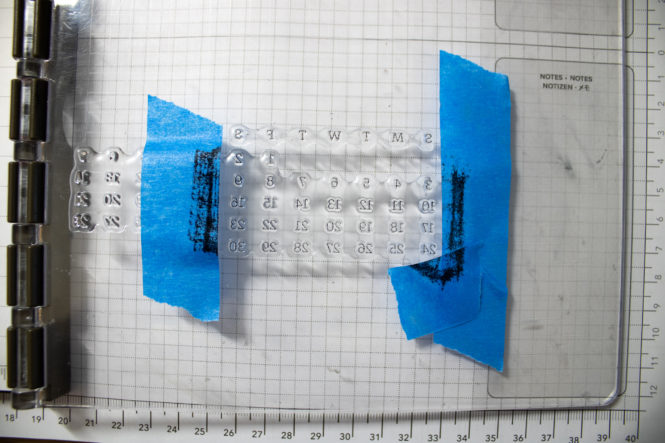
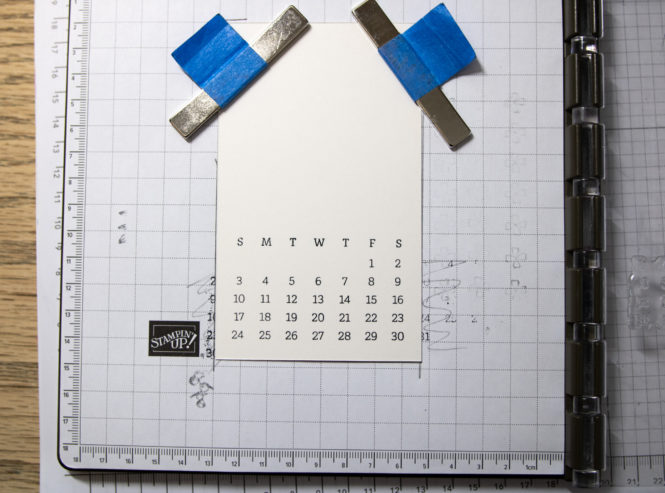
This stamp set gives you the option of setting up the calendar to go Sunday to Saturday or Monday to Sunday. I chose the first option. Using my Stamparatus, I aligned the days and numbers correctly so April 1, 2022 starts on a Friday and ends on the 30th. Then, I used painters tape to mask the numbers I didn’t want to stamp on the sides and the extra 31. After inking up the stamp with Memento ink, I removed the tape and stamped on the lower half of my 3″ x 5″ calendar layer.
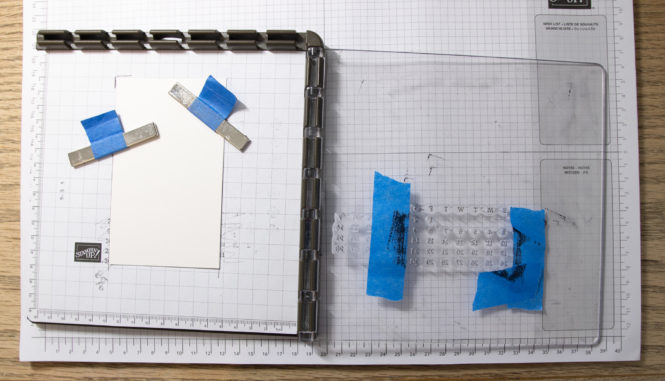
You can see on the left that I marked where to place my cardstock each time, so I could stamp multiple sheets. See below for the end result!
Once I got the hang of it, I proceeded to stamp the rest of April and then went through the same process to stamp all eight May and June 2022 layers (coming soon.) I ended up stamping April on Shimmery White Cardstock and May and June on Basic White Cardstock.
April 2022 Calendar Page – Beauty of Friendship Stamps/Fine Art Floral DSP:
I love to pick my favorite designer series papers (DSP) for these calendars! It’s a great way for me to use up my supplies and remember those gorgeous papers the following year by staring at them for a whole month:) For April, I picked my #1 favorite from the January-June Mini Catalog – Fine Art Floral DSP. I know it sounds a little bit backwards, but I often start the design process for these calendars with the paper, not the stamps!
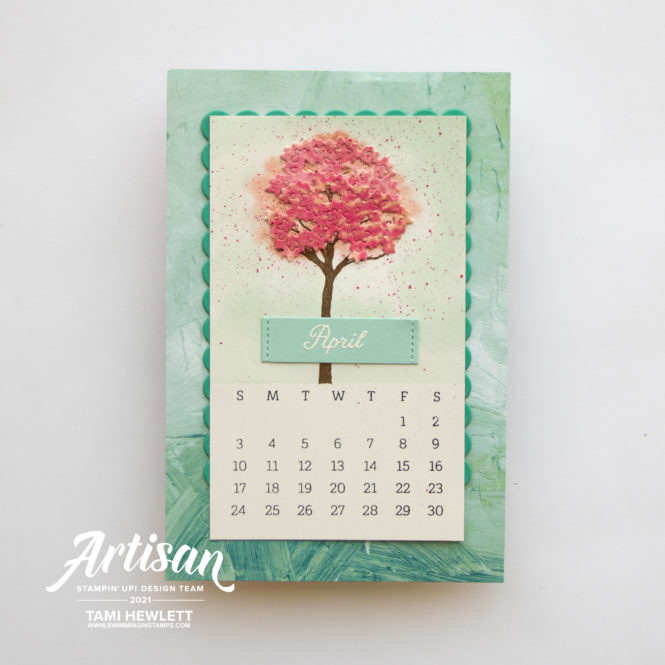
For the stamped image, I used the new Beauty of Friendship stamps. I got the idea for this calendar when I was driving to work one day. Stockton is so pretty in the Spring with all the blossoming trees, and I especially love the vibrant pink ones. I wanted to capture that look, of the floating blossoms blowing in the breeze.
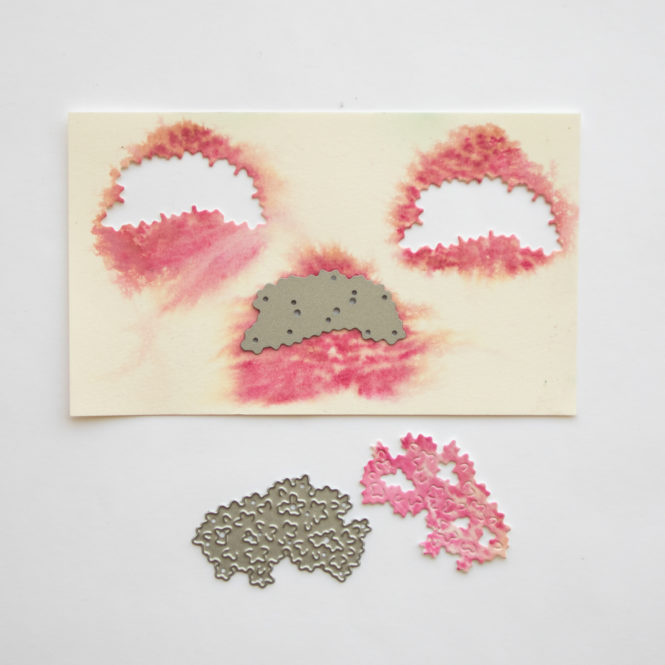
The Beauty of Friendship stamp set has a coordinating die set, but I ended up not using it for this project. I wanted to be able to see the branches underneath the die-cuts, so instead I decided to use a two of the Inspiring Canopy Dies.
April Tutorial:
- Cut Fine Art Floral Series Paper to measure 4″ x 6″.
- Cut Shimmery White Cardstock to measure 3″ x 5″. Use Days to Remember stamps and Stamparatus to stamp days and numbers with Memento ink. (See instructions above.)
- Using a large Water Painter, brush clear water over the top half of the Shimmery White layer. (Avoid calendar portion to ensure Memento ink does not get wet and run.) While paper is still very wet, stamp small (thick) tree leaves with Blushing Bride ink. (Ink will run and that’s OK.)
- Squeeze Pool Party pad to pool ink in the lid and then use a medium Water Painter to watercolor a wash over the remaining background, on the top half of the calendar layer. Let dry completely.
- Stamp tree trunk with Early Espresso ink.
- Use the cap and brush of a Polished Pink Stampin’ Write Marker to flick splatter over the top portion of the calendar page.
- To create the Inspiring Canopy die-cuts: Use a Stampin’ Spritzer filled with clear water to wet the front and back of a separate sheet of Fluid 100 Watercolor Paper. White wet, stamp the small (thick) tree leaves with Blushing Bride. Ink will run. While still slightly wet, stamp small (detailed) tree leaves with Polished Pink. Let dry and use Inspiring Canopy dies to cut out the two pieces shown in the photo above. (You will need to stamp two tree tops for each calendar page to have enough room to cut out both die-cuts.)
- Use Multipurpose Liquid Glue to adhere the two die-cuts on top of the tree.
- Using the Days to Remember stamp set, stamp and emboss “April” in white on Pool Party Cardstock. Cut it out with the Messages Die and adhere on top of the tree with Seal.
- Cut the 2nd largest Scalloped Contours Die from Bermuda Bay Cardstock. Use Seal to adhere it to the back of the Shimmery White stamped layer and then adhere both to the Fine Art Floral DSP.
Supplies for the April page:
Product List
")


 Designer Series Paper")


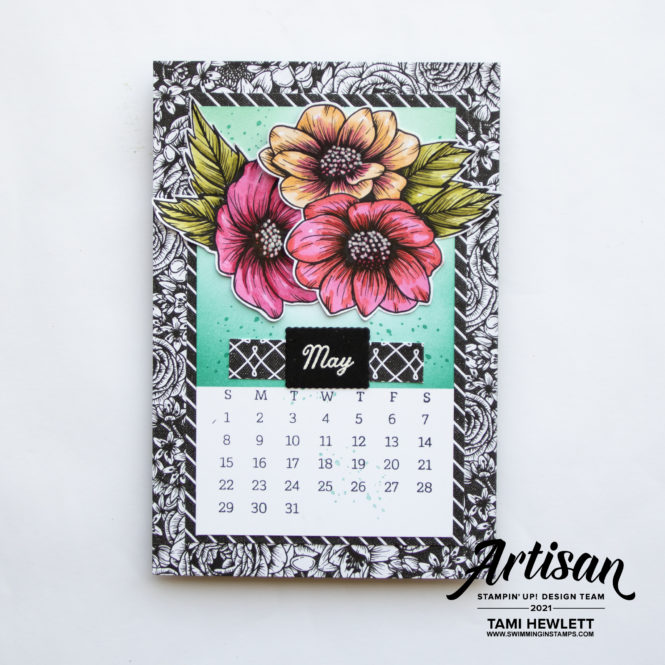
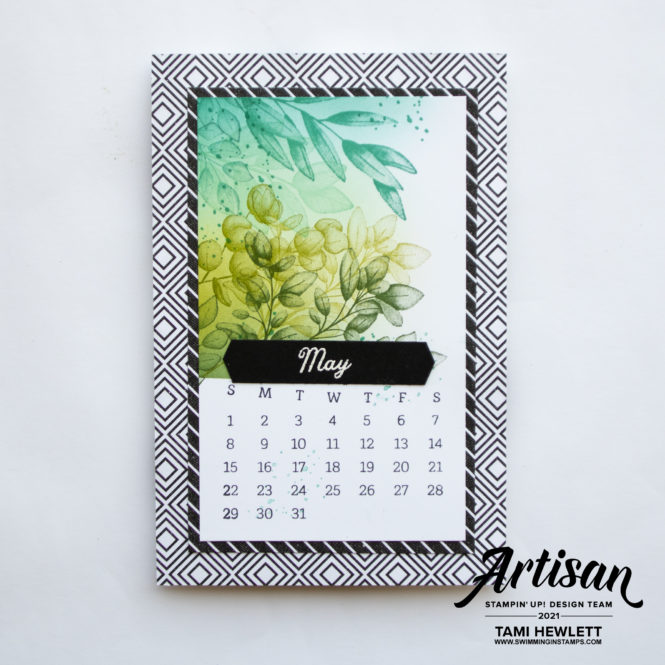
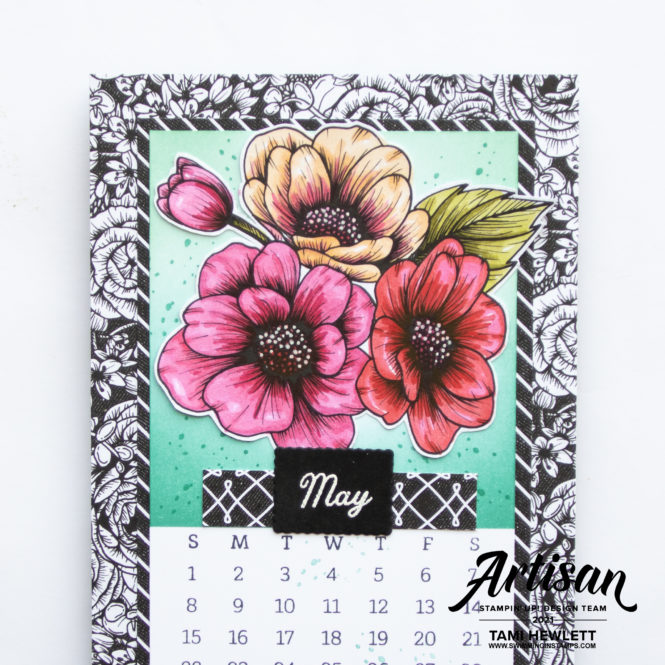
May 2022 Calendar Page- Days To Remember and Forever Fern Stamps/True Love DSP
Another one of my favorite papers from the January-June Mini Catalog is the True Love Designer Series Paper. The flowers are beautiful and perfect for fussy cutting and coloring with Stampin’ Blends Markers. There’s very little stamping on this page at all – just the calendar itself, month, and splatter.
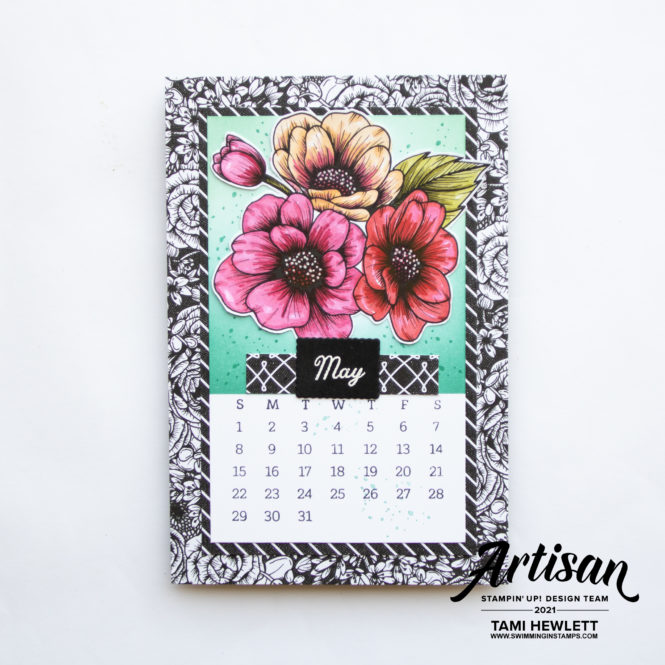
I have a few different versions of this page, since I only had a little paper leftover in my stash. Therefore, I ended up cutting out different combinations of flowers for coloring.
I also created one masculine version for my husband’s office using the Forever Fern stamp set. Real quick, for that version, I created a blended background with Bermuda Bay, Coastal Cabana, Granny Apple Green, and Garden Green ink. Then, I stamped the images with the same colors, sometimes stamping off once for a lighter tone. Finally, I stamped the splatter with Bermuda Bay ink. To create the banner for the month, I notched the ends with the Banners Pick A Punch.
May Tutorial:
- Cut True Love Series Paper (small floral print) to measure 4″ x 6″ and (diagonal stripe print) to measure 3-1/4″ x 5-1/4″. Adhere together with Seal.
- Cut Basic White Cardstock to measure 3″ x 5″. Use Days to Remember stamps and Stamparatus to stamp days and numbers with Memento ink. (See instructions above.)
- Use a scrap piece of paper to mask off the bottom portion of the Basic White layer, and then use Blending Brushes to add Bermuda Bay ink starting from the lower corners and working inward and Coastal Cabana ink starting from the top corners and working inward.
- Stamp splatter with Bermuda Bay ink on the top portion of the Basic White layer. Then, stamp twice over the calendar section (stamping off twice for a lighter tone.)
- Cut out flowers from True Love DSP with scissors. Color with Stampin’ Blends Markers as follows (use brush end unless stated.) Pink flowers: Color the entire flower (except highlights) with Light Polished Pink. Use Light Melon Mambo to color shadows indicated with lines. Continue coloring shadows with Dark Polished Pink and then Dark Melon Mambo, leaving a little bit of the previous color showing each time. Finish with the nib end of the Dark Melon Mambo Marker in the center. Use a similar method to color the red flower with Poppy Parade and Light Polished Pink Stampin’ Blends Markers, and the yellow flower with Pale Papaya and Polished Pink Stampin’ Blends Markers. Color leaves with Granny Apple Green and Old Olive Stampin’ Blends Markers. Use Color Lifter to blend highlights and correct mistakes.
- Color flower centers with Poppy Parade and Polished Pink Stampin’ Blends and then use a Chalk Marker to add dots.
- Adhere Basic White layer and flowers with Seal.
- Stamp and emboss month in white on Basic Black Cardstock and cut out with Messages Die. Cut a layer of True Love DSP measuring 2-1/4″ x 1/2″. Adhere both with Seal.
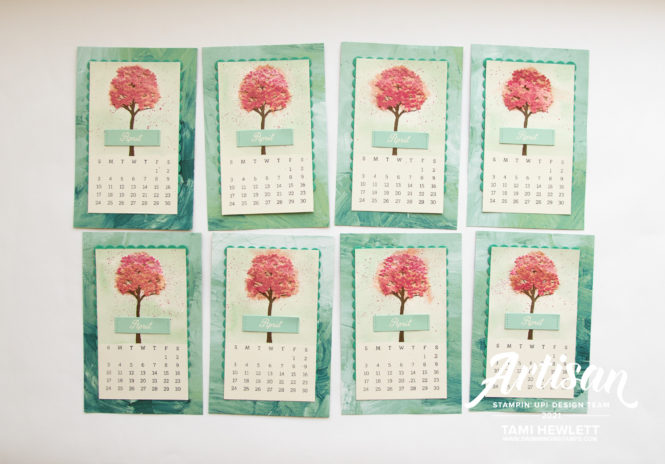
Here’s all eight finished pages! Wahoo!!!

Supplies for the May page:
Product List")
 Designer Series Paper")


")


June 2022 Calendar Page – Friends Are Like Seashells Stamps/Sand & Sea DSP
Well, I had planned to complete June 2022 too, but life got in the way. We’re going to be making some major renovations to our house in July, so I had to stop crafting, and start organizing and packing. We are replacing all the floors, painting the interior, and updating the kitchen. After living here for 31 years, there’s a LOT of “stuff” to sort through … and that’s saying it nicely! Haha! Hopefully, I’ll be back crafting in mid-August. In the meantime, I wanted to at least post the April and May calendars, since the DSP will be retiring at the end of this month.
Have a wonderful and creative day!

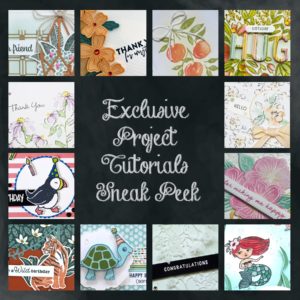
Use Host Code YAQEHSCR for purchases at my online store to qualify to receive free exclusive project tutorials and a special thank you card from me. This month’s PDF features 12 tutorials that are creative and fun! I just know you’re going to love them!!! (Please note that Host Codes are only valid for 30 days. You can always find the current Host Code on the right side bar of my blog.)