


Welcome to the August Stamping Sunday Blog Hop! This month, our theme is favorites from the new August-December Mini Catalog. (Products available to order now through January 4, 2021.)
It was SO hard to choose a favorite!!! There are so many beautiful products in this mini catalog! I ended up picking two favorites: the In The Pines Bundle (consisting of the In The Pines stamps and Pine Wood Dies) on page 43 and the Snowflake Splendor Designer Series Paper on page 37. Both immediately caught my eye. I love the watercolor style of both and all the gorgeous colors in the designer series paper!

For this blog hop, the designers have the choice of 1) creating three versions of the same card for beginner, casual, and avid crafters, or 2) creating a card and 3D project. This month, I choose the first option.
Beginner Crafter:
For all three cards, I used a paper piecing technique that’s super easy and works great with the Snowflake Splendor Designer Series Paper. I cut the paper into 1/2″ strips and then reassembled them by slightly staggering the strips. I’ve done this before with watercolored backgrounds that I’ve hand painted, and considering that this paper is chalked full of watecolored backgrounds, I thought this idea would show a unique way to use the paper.
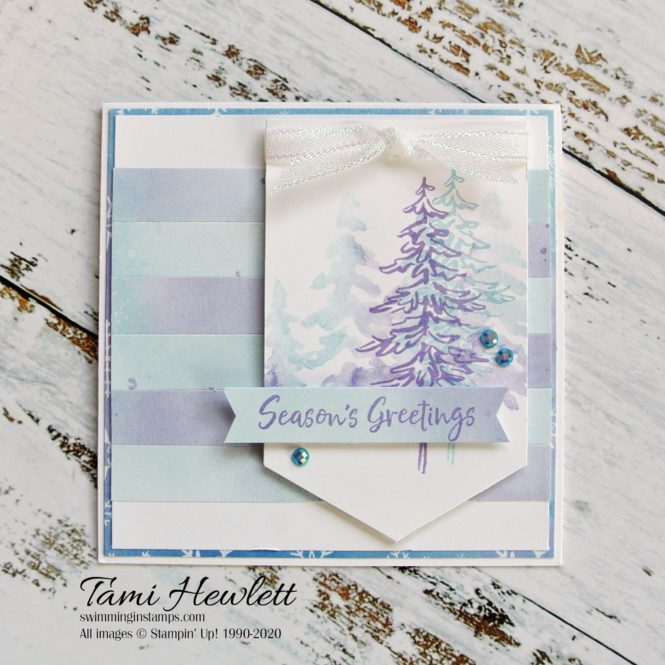
For my beginner card, I tried to stick to stamps, ink and paper … OK with a little ribbon and gems thrown in. (I can’t help it! They are so pretty!!!)
The In The Pines stamps have both solid and detailed trees. I started by stamping the solid trees with Highland Heather and Balmy Blue ink. I inked up part of the stamp with Highland Heather first, and then the rest with Balmy Blue. Then, before stamping, I brushed the stamp with a Water Painter to slightly blend the ink. This technique is super easy and works great with this style of stamps. After stamping a few times, I also stamped one detailed tree with each color.
I trimmed down the stamped panel to form the label and then added a narrow sentiment notched with a “V” on both sides. Both the sentiment label and bottom layer are cut from Snowflake Splendor Designer Series Paper.
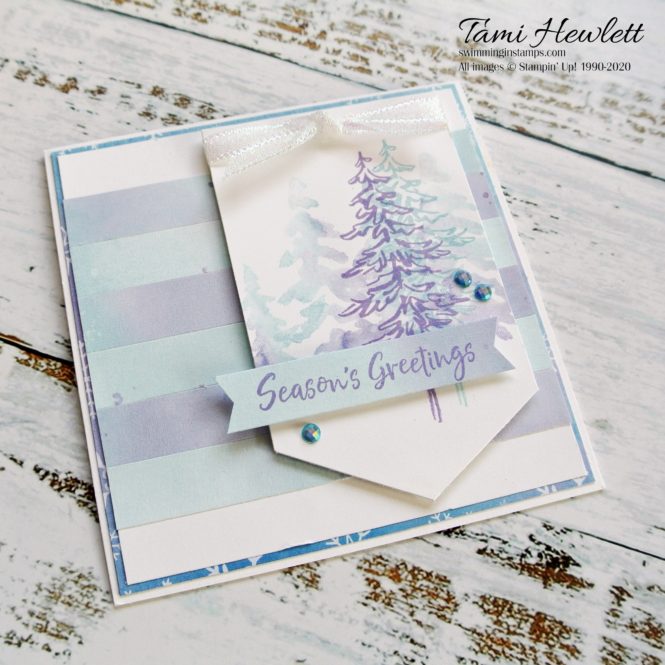
Casual Crafter:
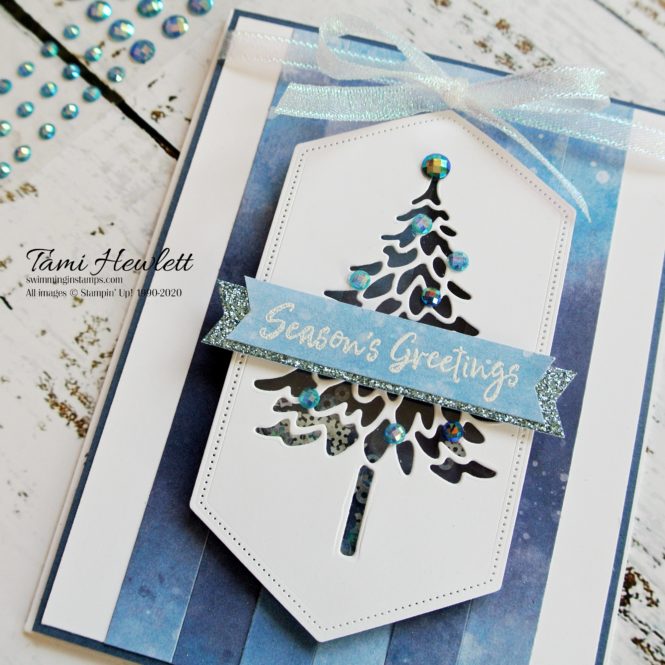
To step up the difficulty a bit, I used the Pine Woods Dies on my second card. I also created a shaker card with some Snowflake Sequins!

I created the background the same way as the first card, just using a different sheet of Snowflake Splendor Designer Series Paper.
Next, I used a Stitched Nested Labels Die to cut the top panel and Pine Woods Die to cut the tree. I think this particular negative die-cut tree is my favorite die in the set! It works especially well with this card, because you can see through to the pretty paper piecing underneath.
I attached a Window Sheet to the back of the tree and then created the shaker with Foam Adhesive Strips. Before adhering it all together, I piled some Snowflake Sequins inside.

I added some Balmy Blue Glimmer Paper behind the sentiment and embossed the sentiment in white. This may be my favorite of the three cards, because I really love the colors, including Misty Moonlight.
Avid Crafter:
To step up the difficulty even more, I added a dry embossed layer to the background and more layers, including white embossed trees. I also used some Frost White Shimmer Paint to stamp subtle snowflakes behind the trees. (I love “getting my sparkle on” for holiday cards!)
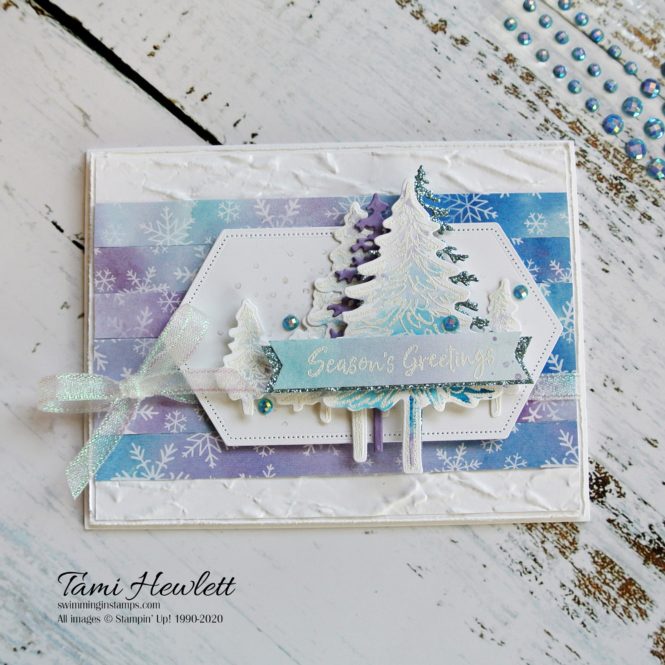
The paper pieced background uses a third print of the gorgeous Snowflake Splendor Designer Series Paper. It’s so incredibly pretty!
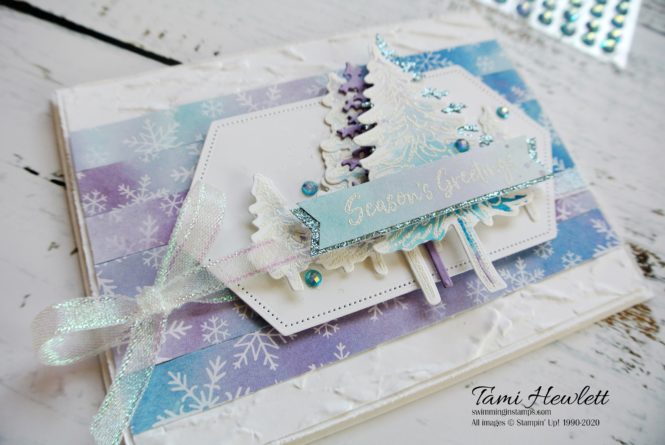
I stamped all the trees with the solid tree stamps first, similar to the beginner card. This time, I used Balmy Blue, Pacific Point, and Highland Heather ink. Then, I stamped and embossed the detailed trees in white on top. I didn’t worry too much about alignment at all. These two-step stamps are super forgiving and easy to use. Lastly, I used the coordinating dies to cut out. the trees
I also cut out some detailed trees from Balmy Blue Glimmer Paper and Highland Heather Cardstock. I just love this die set!!!

I’m not sure if you can see the Frost White Shimmer snowflakes in the photo. I poured some of the shimmer paint on an acrylic block, spread it out with a Sponge Dauber, and then used it as a stamp pad to add the dots to the background. It’s super pretty in real life!!!
On the bottom layer, I embossed the Whisper White Cardstock with the Old World 3D Embossing Folder. I love how it looks like blown snow.

The products in the new August-December Mini Catalog are so inspirational! I can’t wait to see what the other designers come up with. Be sure to click on the links below to continue through the Stamping Sunday Blog Hop and enjoy!
Have a wonderful day!

Use Host Code JCGRRHUS for purchases at my online store to qualify to receive free exclusive project tutorials and a special thank you card from me. The latest PDF features 12 tutorials, including some really creative fancy folds and 3-D projects!


 Ribbon")


")


Oooh these are so pretty Tami.
Thanks so much Tanya!
Beautiful cards, Tami! I love the way you have re-thought the designer paper by using it in strips.
Thanks so much Sara!
Hello Tami, I’m in love with these cards. How do i get the tutorial ?
Thanks so much Cheryl! I didnt write a tutorial, other than what I wrote above. You’re welcome to ask questions.
All absolutely stunning cards Tami. You never fail to wow me! 🙂 xxxx
Thank you so much Cheryll!