


Welcome to the June 2025 Stamping Sunday Blog Hop. We have a super fun theme this month! The designers are picking a sketch from the new 2025-2026 Annual Catalog and then CASEing the design using the new In Colors. CASE means to “Copy And Share Everything” or in other words, find a sketch/project that inspires you and then create an original project with your own twist (different colors, different products, reverse the layout, etc.)
The Annual Catalog is packed with great ideas! There are tons of completed projects AND even sketch layouts on pages 24 and 28. When my creativity needs a boost, I love browsing through the pages to look for inspiration including layouts, color combinations, techniques, and even ways to combine products. The deeper I look, the more I see.
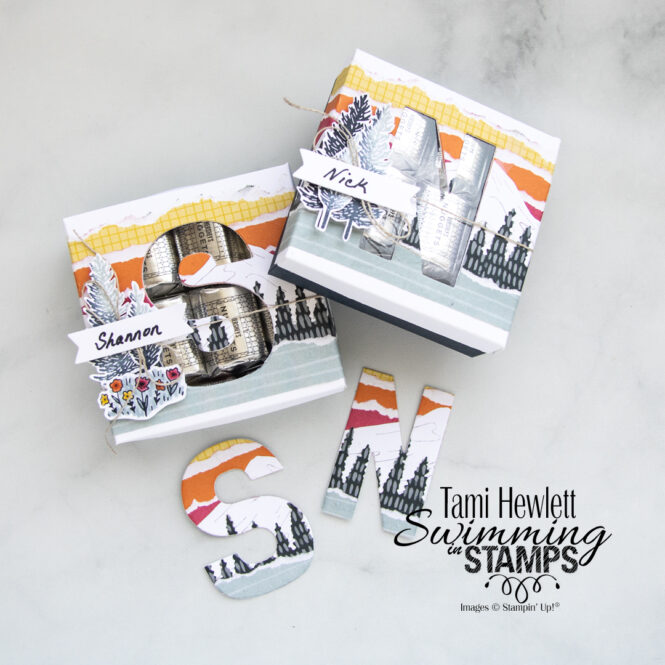
My daughter and her fiancé recently visited. So, I decided to create little welcome gifts. I remembered these adorable boxes from page 87 of the Annual Catalog (see below.) When I first saw them, I knew I wanted to CASE them, so this was the perfect opportunity. I love the see-through windows cut with the Party Alphabet Dies!
The boxes measure 3-1/4″ square and I made them from Thick Basic White Cardstock (tops) and Cloud Cover and Secret Sea Cardstock (bottoms.) The tops have 1/2″ sides, so I cut 4-1/4″ squares and scored each side at 1/2″. The bottoms have 1″ sides, so I cut 5-3/16″ squares and scored each side at 1″. (The bottoms are slightly smaller than the tops so the lids fit.)
Once scored, I slit one side of the small squares on the four corners and used Tear & Tape to form the box. (It also helps to notch the tabs slightly.) However, before adhering the tops together, keep them flat to die-cut and decorate!
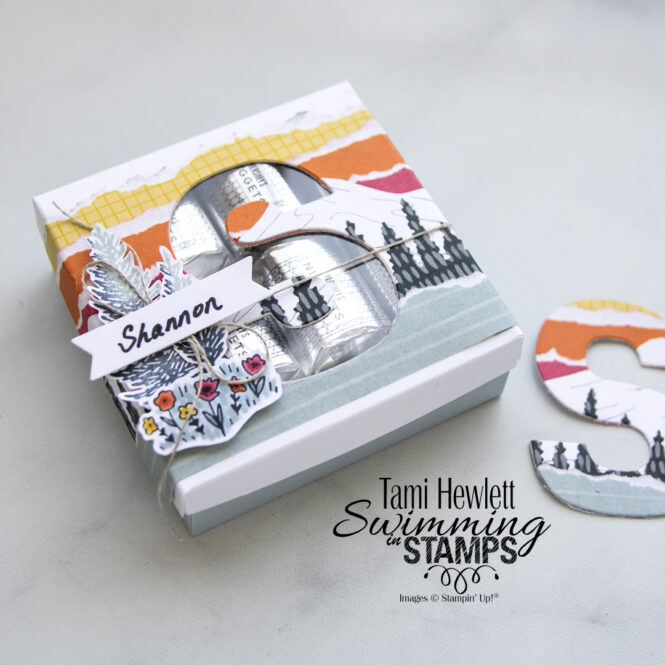
Shannon and Nick live in Colorado and love skiing and the mountains. So I decided to decorate my boxes with the Scenic Adventure Bundle (an Online Exclusive.) I looked through my stash of papers and found Floral Impressions and Florals In Bloom Designer Series Papers with prints in three of the In Colors (Darling Duckling, Secret Sea, and Cloud Cover.) I also had Two-Tone Cardstock in both Strawberry Slush and Timid Tiger!
I tore and layered strips of the papers and die-cut the trees and mountains. Since I knew I was going to die-cut the initials out of the centers, I tried to keep my strips as narrow as possible to avoid too much bulk. I also realized that when I bent the sides, the papers would slightly shorten. Therefore, I waited to trim the sides flush with the box tops until the very last after I had formed the boxes.
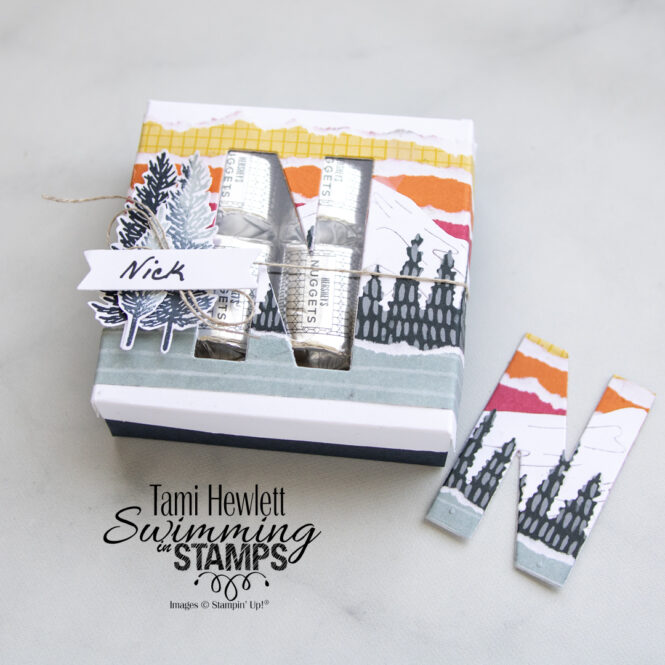
Once I had all my layers glued, I cut out the initials with the Party Alphabet Dies. I needed to use my Paper Snips to finish cutting some of the areas that didn’t go all the way through the layers, but for the most part, the die worked! Also, I’m saving those cute letters I cut out for another project!
Next, I adhered a Window Sheet to the back of the box tops, folded the sides of my box tops, trimmed the layers flush with the sides of the boxes, and adhered them together. Viola! I LOVE them!!!
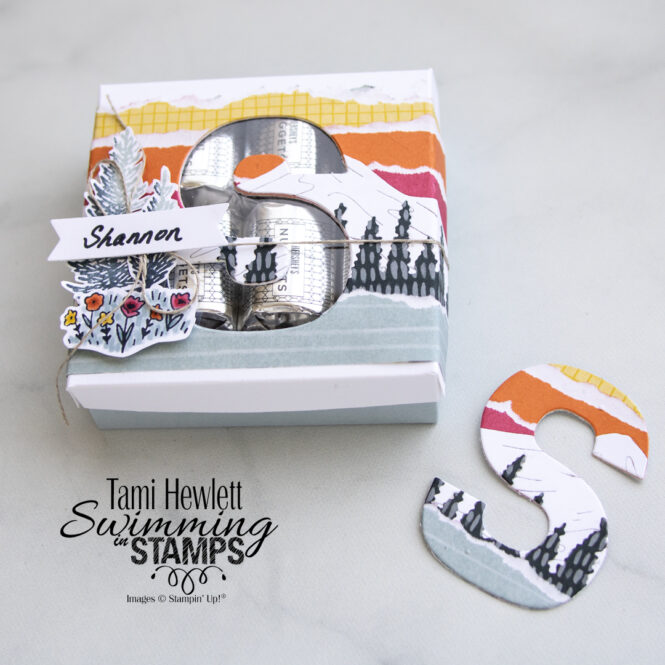
To decorate, I stamped the medium and small trees with Secret Sea and Cloud Cover ink. I also stamped the flowers for Shannon’s box with Secret Sea ink and colored them with Stampin’ Blends Markers.
I used the More Messages Dies to cut the name labels. That big die cuts a bunch of shapes that you can use with or without the coordinating stamp. It’s a really cool die to have in your stash!
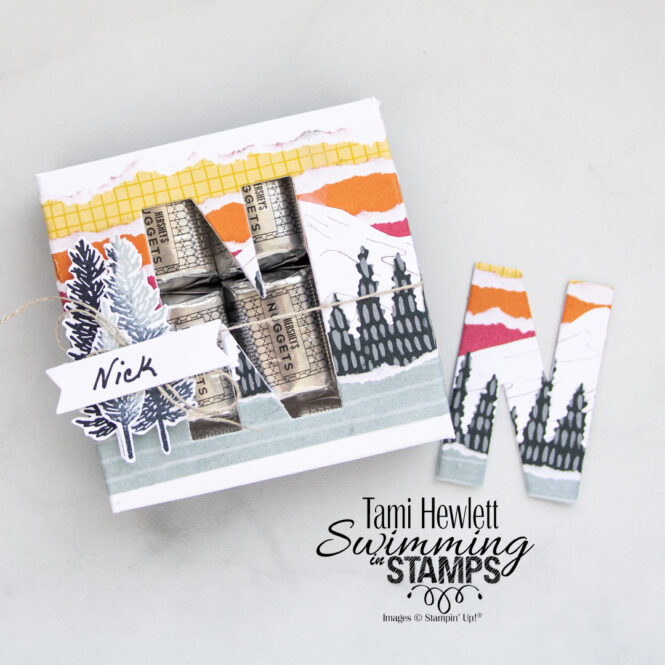
Lastly, I added some chocolates and Linen Thread to hold the boxes closed.
These boxes are so fun. My daughter loves thoughtful details, so I know means a lot to her.
Be sure to follow along the rest of the Stamping Sunday Blog Hop for even more inspiration with this month’s theme. Click on the links below. (If you’re seeing this via email, you may need to click on my header to switch over to my blog in order to see the links.)
Stamping Sunday Blog Hop Designers:
Best wishes for a wonderful Sunday!

Purchase products from my online store to qualify to receive free exclusive project tutorials. This month’s PDF includes 12 tutorials designed by my demonstrator friends and I that are sure to inspire your paper crafting hobby! The projects feature products from the 2025 Annual Catalog, Online Exclusives, and January-April Mini Catalog. Enjoy!
![Scenic Adventure Bundle (English) [ 165468 ]](https://assets1.tamsnetwork.com/images/EC042017NF/165468s.jpg "Scenic Adventure Bundle (English) [ 165468 ]")
![More Messages Die [ 165472 ]](https://assets1.tamsnetwork.com/images/EC042017NF/165472s.jpg "More Messages Die [ 165472 ]")
![Party Alphabet Dies [ 165263 ]](https://assets1.tamsnetwork.com/images/EC042017NF/165263s.jpg "Party Alphabet Dies [ 165263 ]")
![Basic White 12" X 12" (30.5 X 30.5 Cm) Thick Cardstock [ 166782 ]](https://assets1.tamsnetwork.com/images/EC042017NF/166782s.jpg "Basic White 12\" X 12\" (30.5 X 30.5 Cm) Thick Cardstock [ 166782 ]")
![Secret Sea 8 1/2" X 11" Cardstock [ 165624 ]](https://assets1.tamsnetwork.com/images/EC042017NF/165624s.jpg "Secret Sea 8 1/2\" X 11\" Cardstock [ 165624 ]")
![Cloud Cover 8 1/2" X 11" Cardstock [ 165621 ]](https://assets1.tamsnetwork.com/images/EC042017NF/165621s.jpg "Cloud Cover 8 1/2\" X 11\" Cardstock [ 165621 ]")
![Strawberry Slush 12" X 12" (30.5 X 30.5 Cm) Two Tone Cardstock [ 166705 ]](https://assets1.tamsnetwork.com/images/EC042017NF/166705s.jpg "Strawberry Slush 12\" X 12\" (30.5 X 30.5 Cm) Two Tone Cardstock [ 166705 ]")
![Timid Tiger 12" X 12" (30.5 X 30.5 Cm) Two Tone Cardstock [ 166706 ]](https://assets1.tamsnetwork.com/images/EC042017NF/166706s.jpg "Timid Tiger 12\" X 12\" (30.5 X 30.5 Cm) Two Tone Cardstock [ 166706 ]")
![Floral Impressions 12" X 12" (30.5 X 30.5 Cm) Designer Series Paper [ 165603 ]](https://assets1.tamsnetwork.com/images/EC042017NF/165603s.jpg "Floral Impressions 12\" X 12\" (30.5 X 30.5 Cm) Designer Series Paper [ 165603 ]")
![Florals In Bloom 12" X 12" (30.5 X 30.5 Cm) Designer Series Paper [ 165175 ]](https://assets1.tamsnetwork.com/images/EC042017NF/165175s.jpg "Florals In Bloom 12\" X 12\" (30.5 X 30.5 Cm) Designer Series Paper [ 165175 ]")
![Window Sheets [ 142314 ]](https://assets1.tamsnetwork.com/images/EC042017NF/142314s.jpg "Window Sheets [ 142314 ]")
![Sponge Daubers [ 133773 ]](https://assets1.tamsnetwork.com/images/EC042017NF/133773s.jpg "Sponge Daubers [ 133773 ]")
![Secret Sea Classic Stampin' Pad [ 165285 ]](https://assets1.tamsnetwork.com/images/EC042017NF/165285s.jpg "Secret Sea Classic Stampin' Pad [ 165285 ]")
![Cloud Cover Classic Stampin' Ink Refill [ 165279 ]](https://assets1.tamsnetwork.com/images/EC042017NF/165279s.jpg "Cloud Cover Classic Stampin' Ink Refill [ 165279 ]")
![Uninked Stampin' Spots [ 141822 ]](https://assets1.tamsnetwork.com/images/EC042017NF/141822s.jpg "Uninked Stampin' Spots [ 141822 ]")
![2025–2027 In Color™ Stampin' Write Markers [ 165292 ]](https://assets1.tamsnetwork.com/images/EC042017NF/165292s.jpg "2025–2027 In Color™ Stampin' Write Markers [ 165292 ]")
![Cloud Cover Stampin’ Blends Combo Pack [ 165287 ]](https://assets1.tamsnetwork.com/images/EC042017NF/165287s.jpg "Cloud Cover Stampin’ Blends Combo Pack [ 165287 ]")
![Strawberry Slush Stampin’ Blends Combo Pack [ 165290 ]](https://assets1.tamsnetwork.com/images/EC042017NF/165290s.jpg "Strawberry Slush Stampin’ Blends Combo Pack [ 165290 ]")
![Timid Tiger Stampin’ Blends Combo Pack [ 165291 ]](https://assets1.tamsnetwork.com/images/EC042017NF/165291s.jpg "Timid Tiger Stampin’ Blends Combo Pack [ 165291 ]")
![Darling Duckling Stampin’ Blends Combo Pack [ 165288 ]](https://assets1.tamsnetwork.com/images/EC042017NF/165288s.jpg "Darling Duckling Stampin’ Blends Combo Pack [ 165288 ]")
![Linen Thread [ 104199 ]](https://assets1.tamsnetwork.com/images/EC042017NF/104199s.jpg "Linen Thread [ 104199 ]")
![Tear & Tape Adhesive [ 154031 ]](https://assets1.tamsnetwork.com/images/EC042017NF/154031s.jpg "Tear & Tape Adhesive [ 154031 ]")
![Multipurpose Liquid Glue [ 110755 ]](https://assets1.tamsnetwork.com/images/EC042017NF/110755s.jpg "Multipurpose Liquid Glue [ 110755 ]")
![Mini Stampin' Dimensionals [ 144108 ]](https://assets1.tamsnetwork.com/images/EC042017NF/144108s.jpg "Mini Stampin' Dimensionals [ 144108 ]")
Thank ypu Cheryll!
So many gorgeous elements to these fabulous gift giving options Tami. Very impressive! xx